
One of the most interesting MongoDB World 2022 announcements is the release of Vercel-MongoDB integration. What we are seeing here is the gradual simplification and standardization of integrating large infrastructure components. You are able to capitalize on a great deal of power in your data store and host with a minimum of architectural fuss.
Less wrangling with architecture means more time working on your core goals. Let’s take a look at the new streamlined integration.
Using MongoDB and Vercel together was already fairly easy. However, the new official integration offers an ordained approach that is standard and brings with it several niceties. Let’s build on this project I used to demo Vercel-MongoDB integration previously to see how things work.
The hinge between your Vercel and MongoDB Atlas infrastructure comes down to the MONGODB_URI environmental variable. The official integration handles defining this and sharing it for you, along with the necessary permissions.
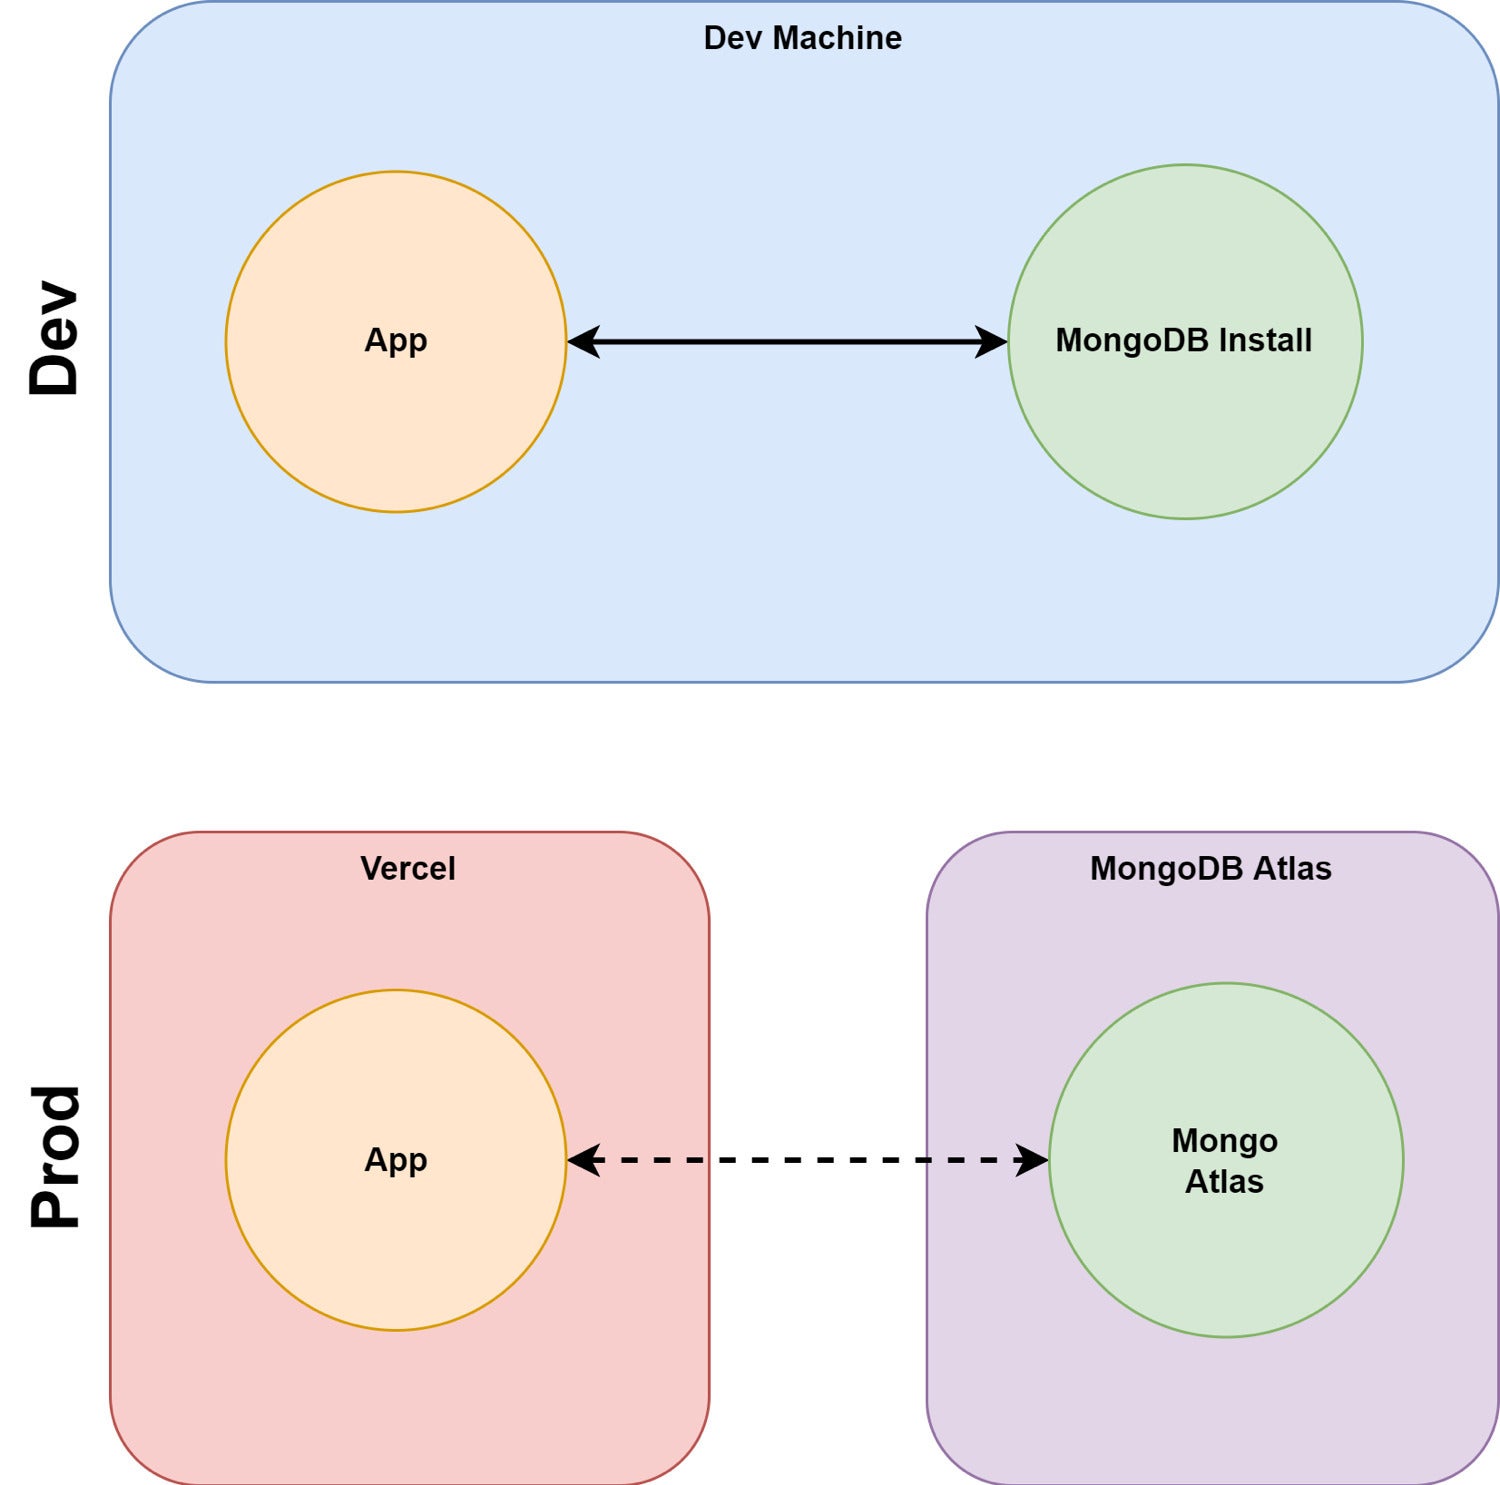
For our demo here, what we want to achieve is a SvelteKit-based app that we develop with locally, with a local MongoDB data store. Then we want to deploy this app to Vercel and have it automatically use a MongoDB Atlas cluster as its data store. This is a very common setup. Incidentally, much of this works the same for React/Next or Vue/Nuxt. The basic setup is seen in Figure 1.
Figure 1. Dev and prod architectures for Vercel-MongoDB app
 IDG
IDGThe SvelteKit demo app
Our demo app is a SvelteKit app that allows for creating a simple document, an apothegm, with a text and an author field, and displays the list of apothegms in the database. For the text of our documents, we’ll use some pithy apothegms.
SvelteKit is a full-stack framework, so we’ll use the load method in our view to hit the back end and load any existing apothegms, as in Listing 1.
Listing 1. SvelteKit’s load() method
 export async function load({ params, fetch, session, stuff }) {
    const res = await fetch('/apothegm', {
      method: "GET",
      headers: { 'content-type': 'application/json' }
    });
    return {
      props: {
        apothegms: await res.json()
      }
    };
  }
You’ll find more info on SvelteKit’s load method here, but the main idea is that we are hitting the back-end API before the page is bootstrapped and inserting the resultant JSON into the props.apothegms field. That field is also exposed on a regular script element, so that the page has access to it, with the line export let apothegms;.
On the back end, the /apothegm get method looks like Listing 2.
Listing 2. Retrieving apothegms from the back end
import clientPromise from '../lib/mongo';export async function get ({request}) {
const dbConnection = await clientPromise;
const db = dbConnection.db("apothegm");
const collection = db.collection("apothegm");
let apos = await collection.find({}).toArray();return {
status: 200,
headers: { 'content-type': 'application/json' },
body: { apos }
};
}
Listing 2 returns a body full of apothegms retrieved from the data store, i.e., from the apothegm database and the apothegm collection. This method largely relies on the clientPromise object imported from lib/mongo. Let’s look at the relevant bits of that module in Listing 3.
Listing 3. The MongoDB helper /lib/mongo.js
import 'dotenv/config';
import { MongoClient } from 'mongodb';const uri = process.env["MONGODB_URI"];
const options = {
useUnifiedTopology: true,
useNewUrlParser: true,
}let client;
let clientPromise;if (!uri) {
throw new Error('Please set Mongo URI')
}if (process.env['NODE_ENV'] === 'development') {
if (!global._mongoClientPromise) {
client = new MongoClient(uri, options)
global._mongoClientPromise = client.connect()
}
clientPromise = global._mongoClientPromise
} else {client = new MongoClient(uri, options)
clientPromise = client.connect()
}export default clientPromise
Listing 3 does its work by creating a connection to a MongoDB instance via the MONGODB_URI environmental variable. This variable is pulled from the environment with the process.env["MONGODB_URI"] call.
Note the first line of this file is a call to import 'dotenv/config'. This import causes the dotenv library to bootstrap itself. The purpose of dotenv is to load environment variables for the app from config files (in an OS-agnostic way). More info on that here.
For our app, we want to set that variable to a local URI during development, and set it to a remote MongoDB Atlas URL during production. We can do that by providing a .env file that dotenv will find during local development but not in prod. To accomplish this, we don’t check the file into version control—we add it to .gitignore. The relevant bits from both files are shown in Listing 4.
Listing 4. Adds to .env and .gitignore
// .env
MONGODB_URI="mongodb://localhost:27017
// .gitignore
.env
.env.*
This means during development, our app will hit the local MongoDB install. At this point, you can launch the app with npm run dev and everything should function.
The Vercel-MongoDB production setup
Now that dev is up and running we’ll turn our attention to setting up prod, or what we are calling prod. In a real-world situation, you would implement testing and staging steps and then promote from staging to production.
In any event, you’ll need accounts in both Vercel and MongoDB Atlas. Both services offer free hobby level accounts that are quick and easy to set up: MongoDB sign up, Vercel sign up.
Import the project into Vercel
Once you have your accounts, you can log into Vercel, create a new project, and import the code for the project. Here’s that GitHub project again: https://github.com/MTyson/sveltekit-vercel-mongo.
Once the import is done, Vercel will automatically build and deploy the project. (Sigh of relief: No extra infrastructure work.) The build will succeed but the project will display an error when you view it. That’s because there is no data store available.
Create a MongoDB Atlas cluster
Now you want to create a cluster in MongoDB Atlas to serve as a home for your production data. In your MongoDB console, it is easy to create a free cluster (instructions here). You’ll also create a database user along the way.
Back to Vercel to add integration
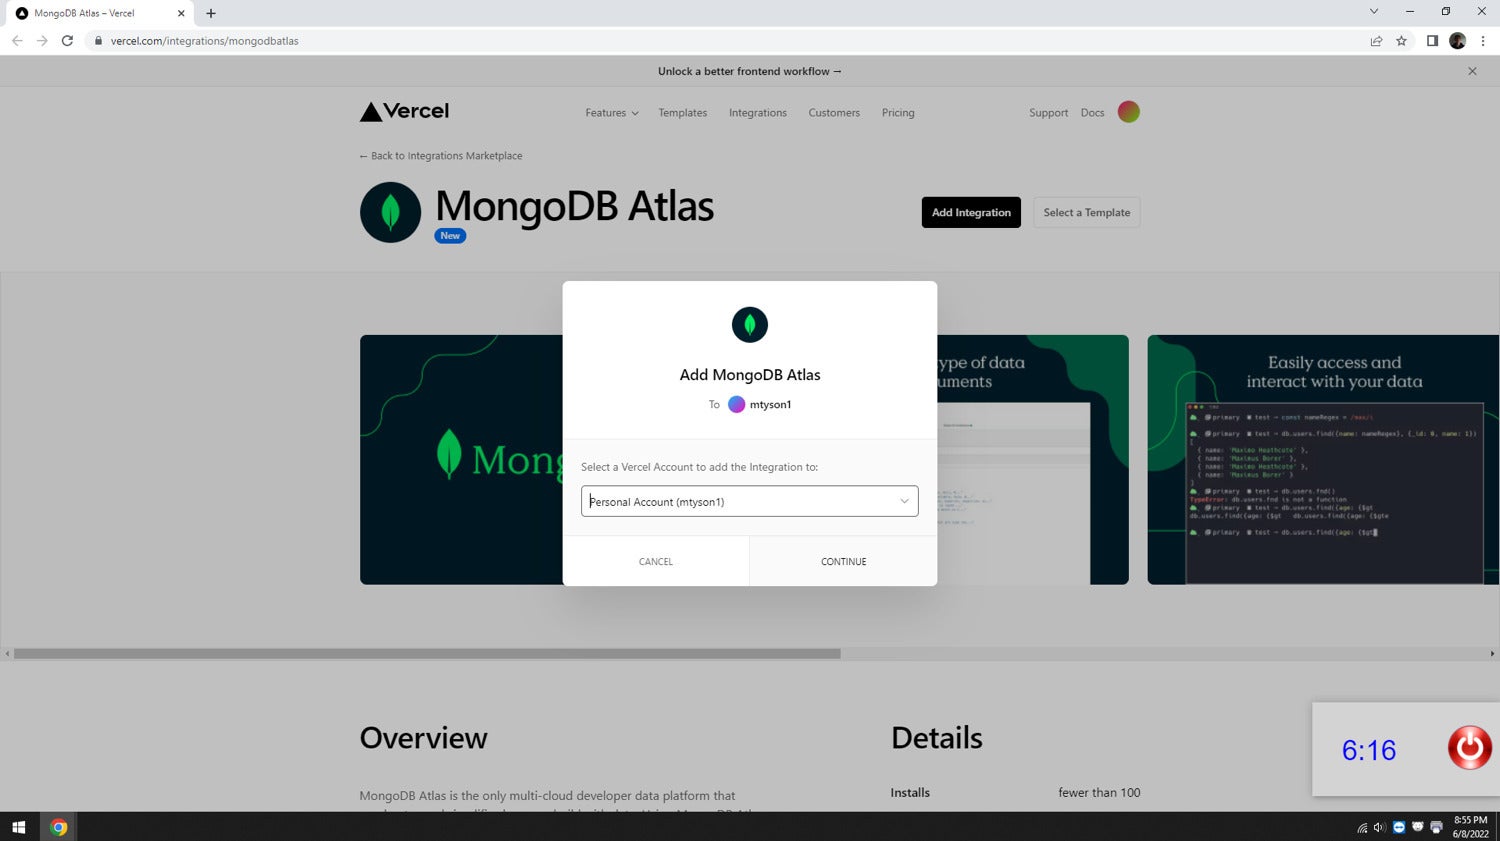
Once you have a cluster available for use, the next step is to add MongoDB integration to your Vercel user account. (In an enterprise setting, you can add this to your Vercel team.) Navigate to https://vercel.com/integrations/mongodbatlas and click the “Add Integration” button at the top. You will be presented with a modal containing a drop-down menu, and the account you want to use should appear there, as in Screen 1 below.
Screen 1. Add MongoDB Atlas integration to Vercel
 IDG
IDGNext you are given the choice to add the integration to all projects or to a specific one. For the sake of this demo, let’s pick “Add to All” and hit continue.
Temporarily back in MongoDB Atlas
Adding the integration will launch a MongoDB signup page in another window. If you don’t already have a MongoDB account, you can set one up. Otherwise, log in to your existing account.
Next, a dialog will ask what MongoDB Atlas organization to add the integration to. Just use the default you set up for your user.
Finally, hit the Acknowledge button on the final screen to accept that you have to manually uninstall the integration if you want it removed, as shown in Screen 2.
Screen 2. Acknowledge organization access in MongoDB Atlas
 IDG
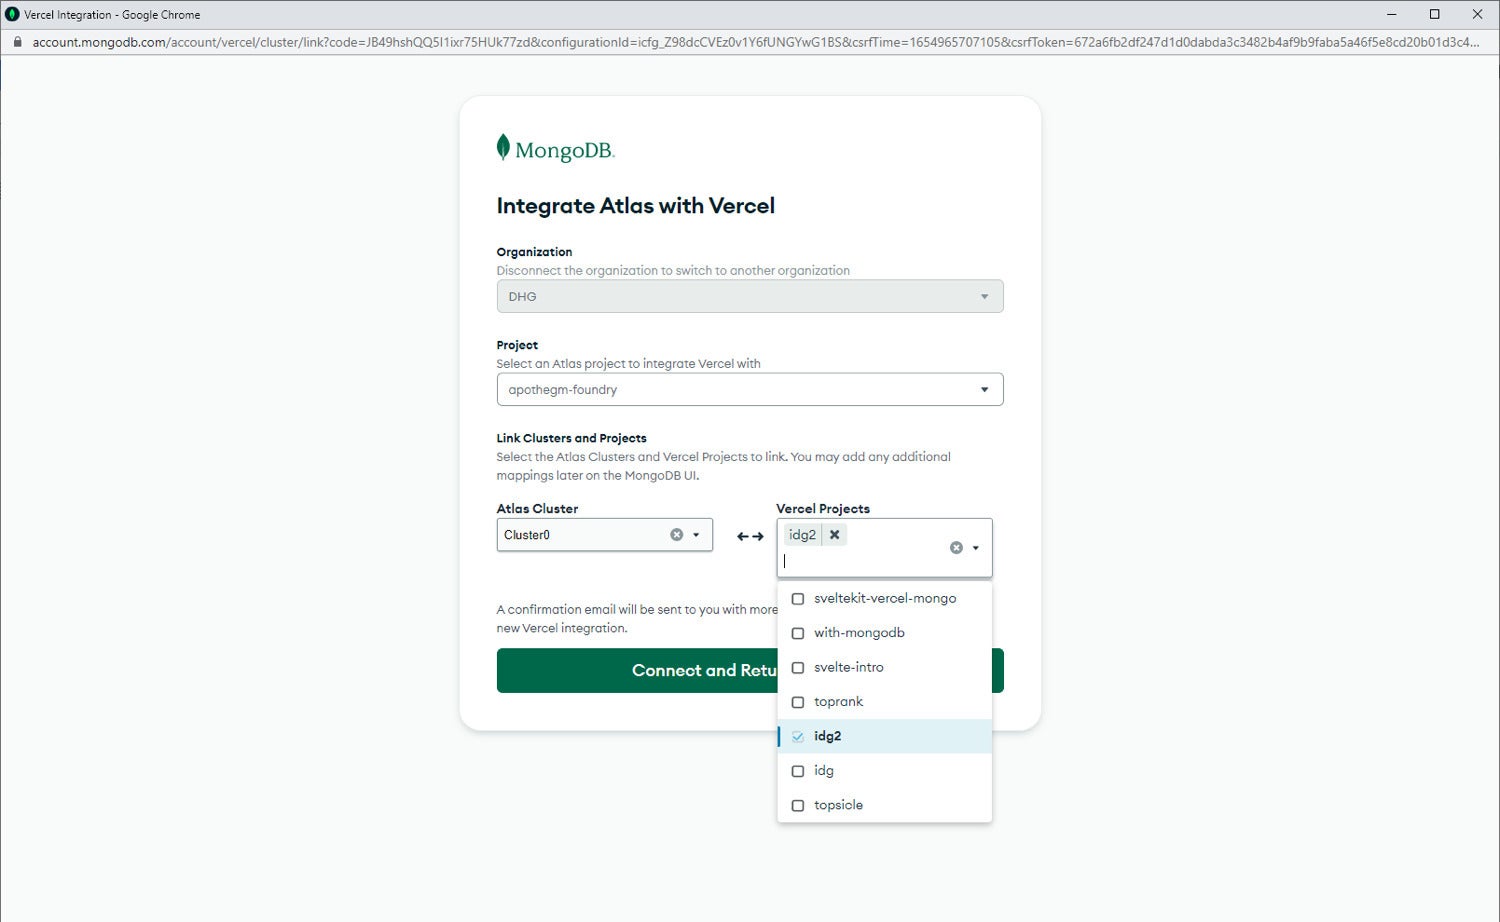
IDGNow you’ll see the MongoDB Atlas project you selected and the clusters within it. You’ll associate a cluster in the left-hand drop box to one or more Vercel projects in the right-hand multiselect. In our case, we want to add the Vercel project we created earlier to the right-hand selection. You can see this in Screen 3.
Screen 3. Associate Vercel project to MongoDB Atlas cluster
 IDG
IDGThe next step is creating the bridge between the MongoDB Atlas cluster and the Vercel project. Make sure you select the correct project on the Vercel side!
Once this is in place, the Vercel project will automatically have access to the environment variable (MONGODB_URL) we need to connect with ease to the data store.
Back to Vercel to test
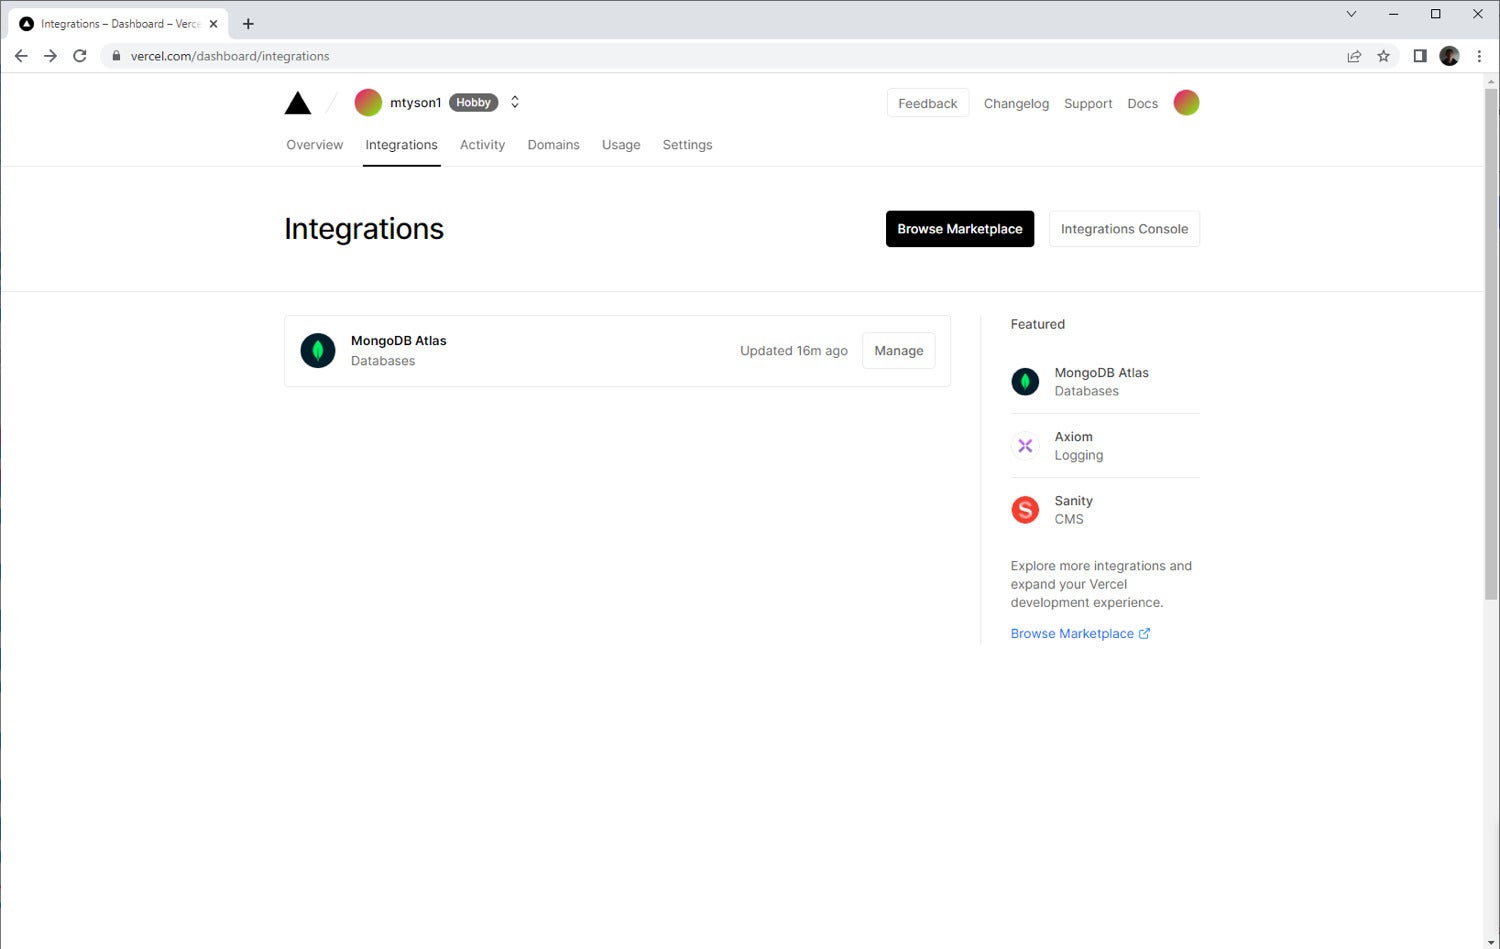
Back in Vercel, you’ll see the MongoDB Atlas integrations in the Integrations tab, as in Screen 4.
Screen 4. MongoDB Atlas integration in Vercel
 IDG
IDGFrom here you can make changes to the Vercel side of the integration (including uninstalling it if you wish, by selecting Manage -> Uninstall).
Next we verify that the Vercel project has taken on the new environmental variable that refers to the MongoDB Atlas install. Open the Vercel project, and click Settings. In Settings, click “Environment Variables” in the left-hand menu. You should then see a MONGODB_URI variable listed there, as in Screen 5.
Screen 5. Environment variables in Vercel project
 IDG
IDGIf you click the eye icon within the variable, you can see the value, which should point to your MongoDB Atlas cluster. This verifies that the environment variable is available to the app when deployed.
Now if you click on the project to view it, you’ll see it running with data driven by the Atlas cluster, as in Screen 6.
Screen 6. Running in prod with Vercel-MongoDB Atlas integration
 IDG
IDGThe bottom line is that the Vercel-MongoDB integration gives us a simple way to connect our application as deployed in Vercel to our data store as running in MongoDB Atlas. A similar approach could be used for associating apps to data in different environments, from test, to staging, to production.
Overall, the integration allows for a more standardized approach to leveraging global “scale to zero” infrastructure with a minimum of fuss.