One of the most promising aspects of the Gutenberg block editor is the ability to add your own custom blocks. They can consist of just about any type of formatted content or functionality you can imagine.
And while you can certainly build your own custom blocks, sometimes that’s a bit like reinventing the wheel. This is especially the case when you want to add a common element such as a testimonial, post listing, or timeline. Most likely, these blocks already exist and can be easily added to your website.
Since Gutenberg’s inclusion in WordPress core, the developer community has released a number of different block plugins. Most tend to include a collection of blocks that could come in handy while building your site.
Today, we’ll introduce you to some of the top custom block collections available for WordPress. Let’s get started!
Ultimate Addons for Gutenberg includes 20+ custom blocks that cover a wide range of use cases. When it comes to layout, the Advanced Columns block lets you create a highly customized multicolumn row.
There are also blocks for adding Google Maps, icons, CTAs, post carousels, and more. That’s just scratching the surface of what this free plugin can do.
Backed by GoDaddy, CoBlocks is a free WordPress plugin that supercharges Gutenberg. While it offers a number of handy custom blocks (accordion, alert, hero, logos, masonry gallery, pricing table, etc.), its big selling point is in page layout.
Offering a more page builder-like experience, rows, and columns can be dragged to size and customized for responsive layouts. Typography is also highly-tweakable as well.
EditorsKit is a bit different than the other plugins in this collection, as it’s more about extending the blocks already included in Gutenberg. The rich text formatting features allow you to further style your content or wipe out all custom styles with a single click. You can also control the visibility of blocks based on device, login state, or even custom field values.
In addition, there are a ton of productivity tweaks, like support for markdown, code editor syntax highlighting, and the ability to import or export specific blocks. With so many goodies, it may just make Gutenberg feel like a completely different experience.
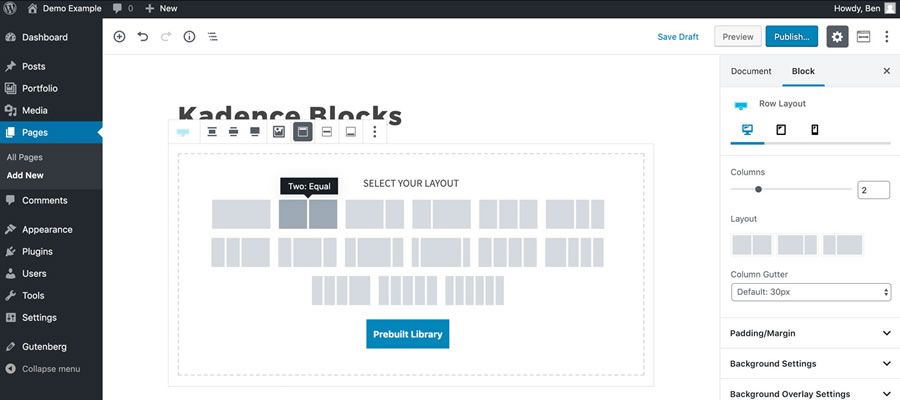
Kadence Blocks offers a dozen custom blocks that cover common needs. Included are row layouts, advanced galleries, tabs, info boxes, and testimonials – among others.
It also aims to solve one of the more frustrating issues with Gutenberg – the editor’s width on the back end. The plugin contains preset widths that enable content creators to get a better representation of what pages will look like on the front end.
With an aim to both speed up content creation and add different content types, Gutenberg Blocks and Template Library is a compelling option. Much like Atomic Blocks above, the included Section block offers a number of pre-designed templates and layouts.
There are also several customizable elements such as Google Maps, post grids, author info, and a block for Font Awesome icons.
Sure, Advanced Gutenberg comes packed with several custom blocks (post sliders, WooCommerce products, advanced tables, advanced lists, etc.). Those are all nice and handy. But the really interesting feature here is the ability to create “edition” profiles, which allow you to turn blocks on or off for specific users or user roles.
For example, if you only want administrators to have access to the Column Manager block, you can easily set it up. This helps to ensure that lower-level users don’t wreak havoc on your designs.
Get Some New Building Blocks
The default blocks that come with Gutenberg are useful and are constantly being refined. But to create a true page-building experience, you’ll want to add some custom elements.
That’s where the plugins above can help take your website to greater heights. Not only can you add different types of functionality and content, but you can also take greater charge of the editor as a whole.
The bottom line is that if you’re going to use Gutenberg for complex page layouts, you might as well go all in. These plugins will help you do just that.
Glitch effects are a great way for making a statement with your photos or graphics. However, manually creating these effects can be difficult. Luckily, Photoshop actions provide a simple solution.
Glitch effect Photoshop actions are pre-made adjustments or edits that allow you to create digital effects that mimic the look of technological glitches, malfunctions, or distortions.
By applying these actions to photos or graphics, you can add a unique and eye-catching aesthetic to your design work. The actions streamline the process and can save you time and effort while allowing you to experiment with different styles and settings to achieve the desired look.
In this collection of glitch effect Photoshop actions, you’ll find a range of options that allow you to add a distinctive style to your images. Each action is unique in its own way, and experimenting with various settings and intensities can result in a memorable and unique look.
What is the Glitch Effect?
Glitch effects are a creative technique that adds digital distortions and irregularities into images. These effects replicate the visual glitches often associated with technology errors.
To create a glitch effect, photographers often use Photoshop actions. They allow you to manipulate various areas of the image, such as color channels, pixelation, and distortion, to create glitch-like anomalies.
The glitch effect is a unique way to experiment with the boundaries of photography and embrace the beauty of imperfections.
These VHS glitch effect Photoshop actions create a corrupted video effect on your photos. The action includes ten glitch effects, all combined into one PSD file. The effects will add static, slices, and retro-inspired glitches to any photo.
Another great option is the SoGlitch Photoshop action set. It includes six glitch effects you can combine and customize to create truly unique effects. You can sharpen the effects, change colors, and contrast to suit your needs. The layers are well organized, and the effects are non-destructive, so your original photos remain intact.
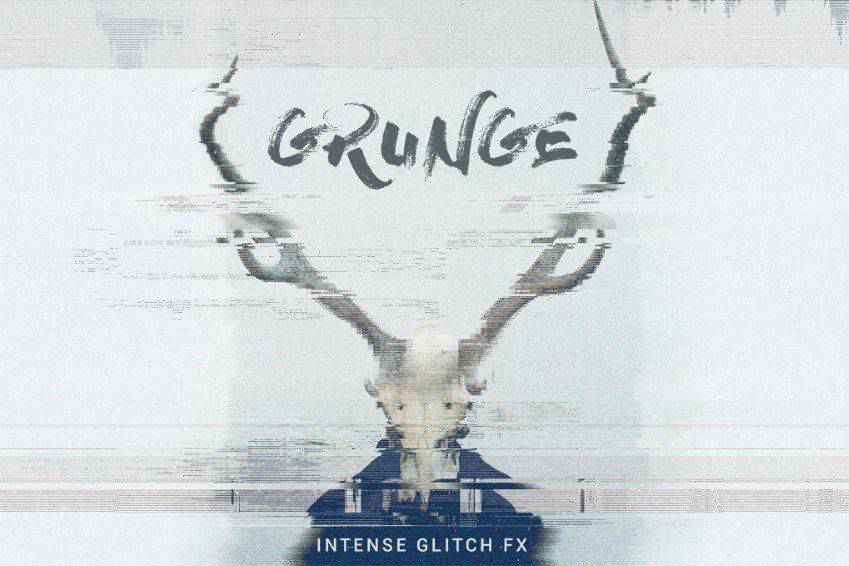
Grunge Glitch Photo FX is another excellent option. The intense effect can be used on photographs, illustrations, or even logos. It includes over 20 glitch effects, 10 textures, and 7 RGB color effects. The effect is also non-destructive, so your original photos stay intact.
The Futuristic Glitch action set adds all sorts of glitches to your editing repertoire, including lines, errors, double exposure, and more. This set comes with 14 glitch Photoshop actions and simple instructions that make getting started easy.
This Photoshop action pack lets you use a VHS-style glitch effect on your photos. Once you hit play on the action, it will appear as though your photo has been hit with the tracking feature on old VCRs. The tracking lines across the screen distort and warp the image and create a vintage effect.
Here’s another fantastic glitch effect option. Once applied to your photos, it creates a blurred look, as though your eyes are slightly out of focus or you are looking at a 3D image without 3D glasses. It includes ten glitch effects, each giving your pictures a sense of motion.
The Anaglygh Glitch Photo FX action is easy to apply to your photos. It comes with a default template and an online video tutorial, so you’ll learn how to use it quickly. The finished effect makes it appear as though parts of your image have been shifted to one side or the other via blocks or lines.
Give your photos a darker feel with the Distorted Glitch Photoshop Action. It works best on high-resolution photos and has organized layers, making it easy to make adjustments and customizations as you see fit. The result is an edgy, techno look that can be accented with hints of color.
The Animated Glitch Photoshop action set gives your photos a gritty, technology-inspired look. It comes with 12 color options and well-organized layers, and you can export these effects in images, animated GIFs, or videos. The action set also includes a text and video walkthrough guide.
The Digital Glitch Effect Photoshop action set is another easy-to-use option. This action is a great way to add an old film artifact aesthetic to your images, giving them a grungy, digital look. This set comes with adjustable layers, full instructions, and more.
The Geometric Glitch Photoshop Action adds a glitched-out shift to your photos. It makes it appear as though parts of your image have broken off and displaced into geometric shapes. It comes with an action file, a brush file, a pattern file, and a help file.
This is such a fun action! This glitch effect comes with three PSF files that you can use to create a glitch effect on a single photo or on a series to create a GIF. It comes with a full tutorial, and all layers are editable and customizable to achieve the exact look you want.
The Twitch Glitch Photoshop action is another fun set. It comes with 20 color presets and can be used on a wide variety of materials, including those for print or the web. It also comes with a video guide and a help file, both of which make getting started with this action easy.
If you want to add a glitch effect to text in your photo composites, this action is a great choice. Once you’ve created a design, add it to a smart object. The glitch effect will work on this object. Or you can glitch your background instead. This action set comes with ten styles, organized layers, full customization, and a PDF help file.
This set of Glitch Art Photoshop Actions is another excellent choice for editing your photos. It works by adding colorful, glitchy effects to your images, resulting in abstract art. This set comes with ten fully editable effects that create non-destructive layers.
Glitch Effects with Animated GIF Creator is another way to add glitch effects to your photos, with the added benefit of being able to add glitches to GIFs, too! It includes a PSD file, smart object support, and a drag-and-drop template. It has eight different glitch effects, which you can combine to create a unique look. It comes with a full tutorial as well.
Give your photos a dark and distorted look with the Glitch 2 Photoshop Action. This effect works best on high-resolution pictures and is a one-click action. You can adjust the settings as you see fit. It also has well-organized layers and elements for easier customization. Plus, it comes with full documentation.
You may also want to consider the GIF Glitch Animated Photoshop Action. This one provides a template that can be used in various ways to create GIFs or animated video sequences out of photos, text, or illustrations. All you have to do is add your photo to a smart object. It also comes with a full PDF instruction manual.
Another eye-catching choice is the Face Glitch FX action. As its name suggests, this effect works best on photos of faces and includes a written and video tutorial for proper use. The end result is an image that is as haunting as it is interesting, with the subject’s face appearing as though it has been smeared.
Last in our collection is this Glitch Photoshop PSD Template, which works by distorting photos in a stylistic way with just a couple of clicks. It’s super easy to use and comes with ten color settings, ten glitch layers, and 11 free actions for creating additional distortion effects. This set also comes with full instructions and a PDF tip guide.
How to Install Photoshop Actions
Download and unzip the action file
Launch Photoshop
Go to Window > Actions
Select Load Actions from the menu and go to the folder where you saved the unzipped action file to select it
The Action will now be installed
To use the newly installed action, locate it in the Action panel
Click the triangle to the left of the action name to see the list of available actions
Click the action you want to play and press the play button at the bottom of the Actions panel
With various options to choose from, you’re sure to find the glitch effect that suits your creative vision. Don’t hesitate to experiment with different actions and settings to achieve the desired result. Above all, have fun and let your creativity shine!
As a designer, you spend most of your time doing actual design work. But there are so many other things that go into running a successful design business. One of those things is invoicing. You can certainly fire off an email to clients stating the amount owed, but that’s not the most efficient method.
You could also use automated billing software to handle your invoicing. However, that’s not in the budget of every designer. Sometimes, all you need is a simple invoice template to get the job done. And that’s exactly what we have for you here.
These free invoice templates are easy to edit and re-use. While all the templates are free, double-check licensing before adding them to your workflow. The templates come in various formats, including InDesign (INDD), Word, Excel, Photoshop (PSD), Sketch, and Illustrator (AI & EPS).
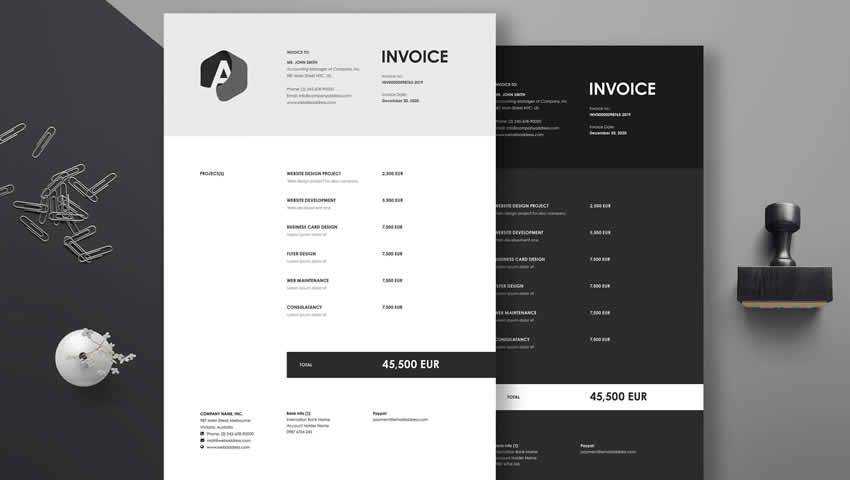
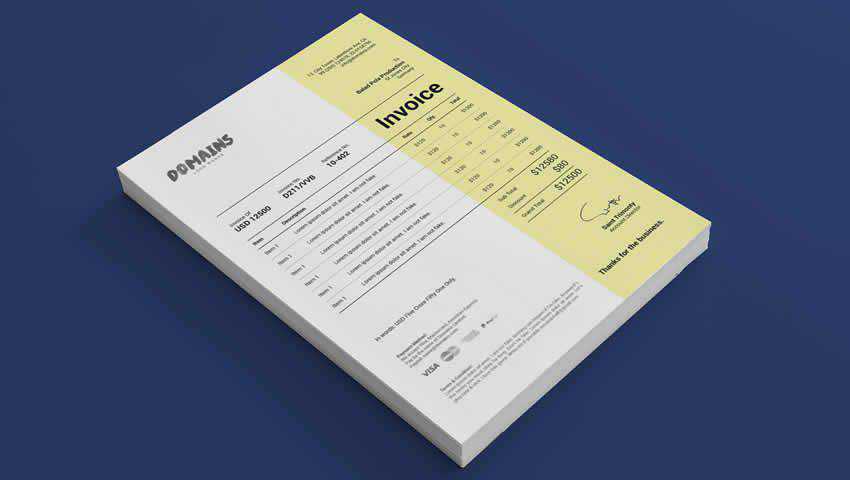
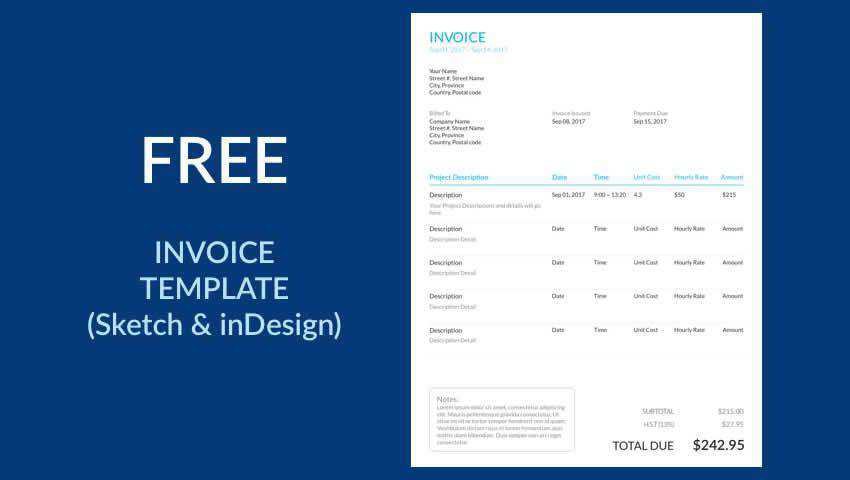
In Photoshop PSD Format
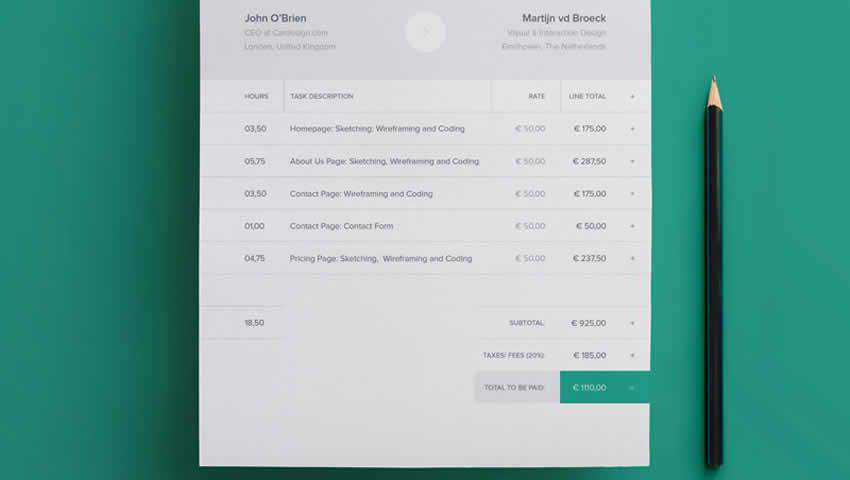
This minimal invoice template would be an excellent choice. It has an understated black and white design and can be easily edited to suit your own branding. You can edit the logo, contact information, and color scheme all within Photoshop.
The template is organized neatly into layers, so you should have no issues customizing it and re-using the template over and over for all of your clients.
In Word & Excel Formats
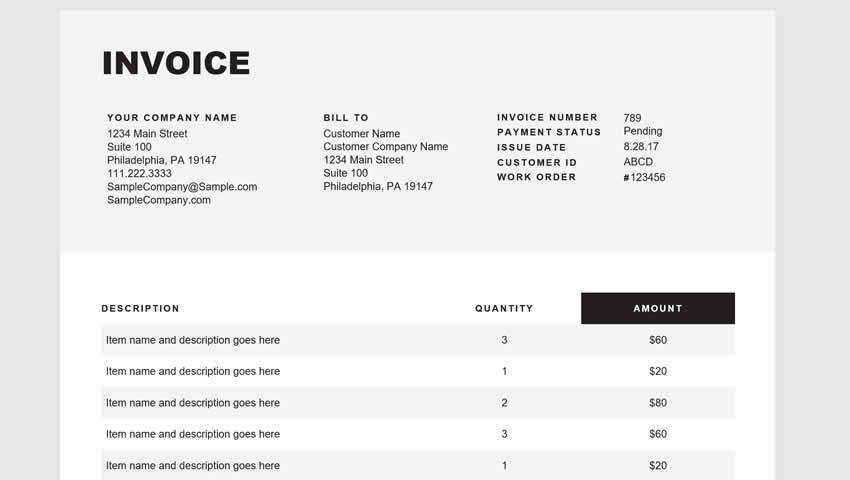
This invoice template has been specifically designed for web and graphics designers. It is available in Word and Excel formats and can be quickly customized to suit your business needs. You can add your business name, logo, and contact information, customize the number of lines, and your invoice will be ready for use.
In Illustrator AI Format
This free invoice template bundle has been organized into layers for quick cutomization in Illustrator. It uses free fonts, so you can easily replicate the look of the sample template. It’s fully print-ready in CMYK and at 300 dpi. You can add a custom logo and contact information and modify the line items to reflect your business or the project you’re working on.
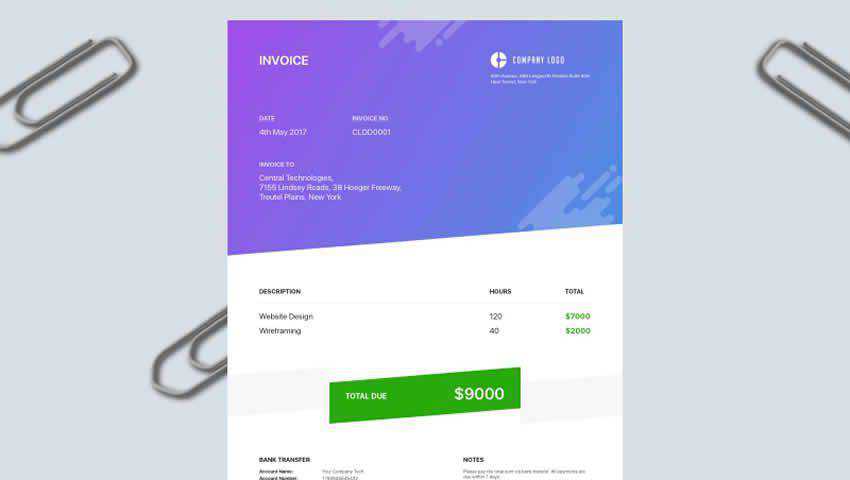
In Sketch Format
This invoice template features a modern design with a bold and colorful header that makes it stand out. To get started using this Sketch App template, simply add your logo and contact information. From there, add your line items and client’s info, export the file, and repeat next month. Easy as that!
In Illustrator AI & InDesign INDD Formats
This minimally designed invoice template can be quickly edited in Illustrator and is sized at US Letter or A4. It includes free fonts and is print-ready. You could also export to PDF and submit your invoices that way, too. Add your logo, company name, line items, and reference numbers, and your invoice is ready to send.
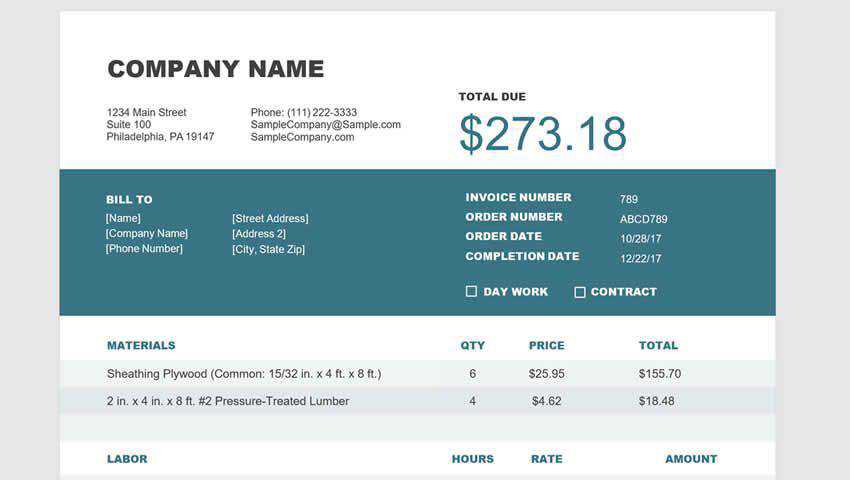
In Word & Excel Formats
These free templates for contractors are in Word and Excel formats. They feature a colorful stripe across the center of the invoice to add some style, but it does so without diminishing the general form and function of the invoices. You can customize the logo, company info, client info, and anything else you need to get paid promptly.
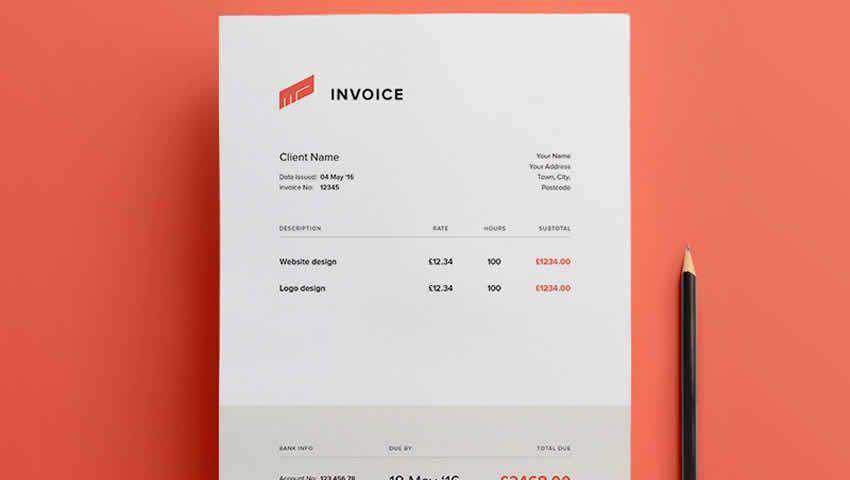
In Illustrator AI Format
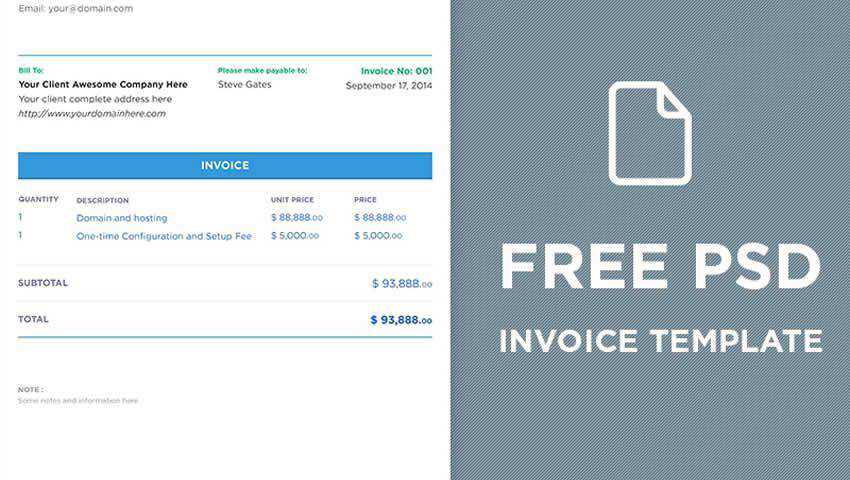
This free invoice template has been designed for freelancers. It can be quickly edited in Illustrator. You can customize the logo and color scheme, determine the payment amount, include your company information, and add anything else you need. You can also include information about how you would like to be paid.
In InDesign INDD Format
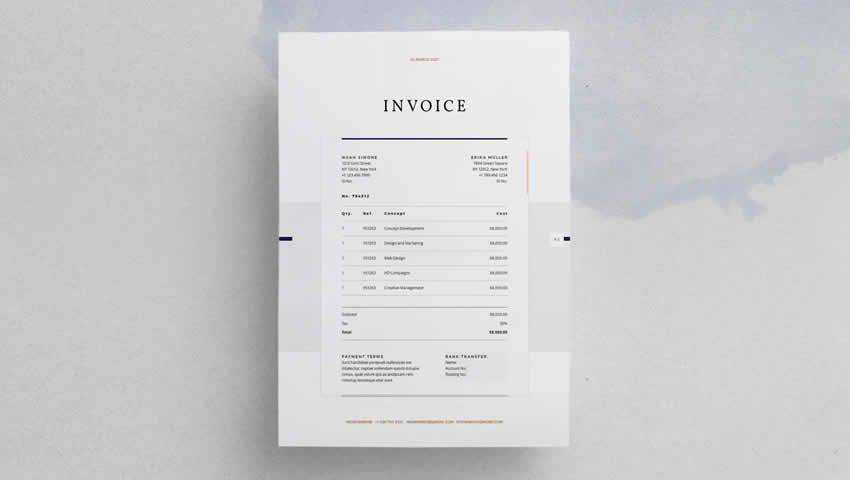
This invoice template’s design is understated. It is simply black and white, but it does include subtle lines and bold areas to create a professional finish. The invoice is in Adobe InDesign format and is suitable for any business type, including freelance design.
In InDesign INDD Format
This InDesign template has been designed with simplicity, but it does a lovely job presenting your billable hours. My favorite part is the arrow pointing from your information to the clients. It’s a great visual cue. If you prefer a minimalist aesthetic, you could go logo-free, and the invoice would still look amazing.
In AI, EPS, INDD & PSD Formats
This grid-based template is another simple black and white invoice with a minimalist design. The design is focused on the important information you want your clients to see. This cross-platform invoice template can be customized with your own logo, company information, and signature.
In Word & Excel Formats
These simple invoice templates have been designed for editing in Word and Excel. To get started, add your logo and company information, fill in the details of your latest project, and then add the payment terms. These free templates offer a simple solution to an issue that can be time-consuming, especially if you have many clients.
In Photoshop PSD Format
This clean invoice template is available in both Word and Excel and is very easy to configure for personal use. Add your logo and contact info, choose a color scheme, add your line items, and export the file.
In InDesign INDD Format
The overall design of this InDesign invoice template is muted but professional. You can customize the logo, company info, and imagery. The paragraph and character styles make for a consistent layout that would suit many business types.
In Sketch & InDesign INDD Formats
The last invoice template in our collection is available in Sketch and InDesign formats. It is very easy to edit and export. Simply select the colors you want to use, input your business information, add the payment details, and you’re good to go.
Invoice Template FAQs
What are Invoice Templates?
They are pre-designed invoice templates tailored for designers. They are designed to help you bill clients for design work, providing spaces for all necessary information.
Why Use Invoice Templates Specifically for Designers?
They cater to the unique billing needs of designers, including sections for specific services, hours worked, and materials used, in a format that reflects a designer’s professionalism.
Can I Customize These Templates to Match My Brand?
Yes, you can easily modify these templates to include your branding elements like logos, brand colors, and fonts.
Do These Templates Include All Necessary Legal Information?
Most templates cover essential elements, but it’s always good to tailor or add any specific legal terms relevant to your work or location.
How Can a Well-Designed Invoice Benefit My Design Business?
A professional invoice reflects your attention to detail and professionalism, reinforcing your brand’s credibility and encouraging timely payments.
Can I Convert These Templates into Different Formats?
Yes, most templates can be converted into various formats like PDF, Excel, or Word, depending on your preference for digital or print use.
What Key Information Should I Include in My Invoices?
Your invoice should include your contact information, client’s information, details of the services provided, prices, payment terms, and due date.
Are There Specific Invoice Templates for Different Types of Design Work?
Some templates are tailored for specific design fields like graphic design, web design, or interior design, addressing the particular billing practices of each field.
Conclusion
This collection of free invoice templates will help you manage getting paid by your clients without spending a lot of extra time facilitating it.
As always, double-check the licenses of these free templates before using them to be on the safe side. Otherwise, enjoy not having to spend so much time on invoicing anymore!
Custom fields are among WordPress’s most powerful features. They allow us to customize the front and back end of a website, and there are all manner of creative uses for them. Everything from displaying niche content to changing page layouts based on field values is possible.
Traditionally, using custom fields meant navigating obstacles. They require coding knowledge or a plugin to render field data. Implementing them can be time-consuming and out of reach for some users.
The WordPress Block Bindings API removes some of these limitations. It allows us to “bind” custom field values to a WordPress block. You don’t need a plugin to use them, as the function is built into the Block Editor. Registering fields still requires code, though.
Regardless, using the API is a time saver for developers. Here’s a look at how it works, along with a real-world example.
What You’ll Need to Use the Block Bindings API
The WordPress Block Bindings API streamlines the rendering of custom field data. However, you’ll need a few things to use it:
The latest version of WordPress;
A theme with a functions.php file or a custom plugin to house your code;
That’s all there is to it! The API works with both block and classic themes. Use a block theme if you prefer a no-code experience.
We should also note some of the API’s limitations. As of this writing, it works with the Paragraph, Heading, Button, and Image blocks. Data types are also limited to content, text, URL, etc. Check the documentation for more details.
With that out of the way, let’s see an example of the Block Bindings API in action.
Example: Let’s Bind a Custom Field to a WordPress Block
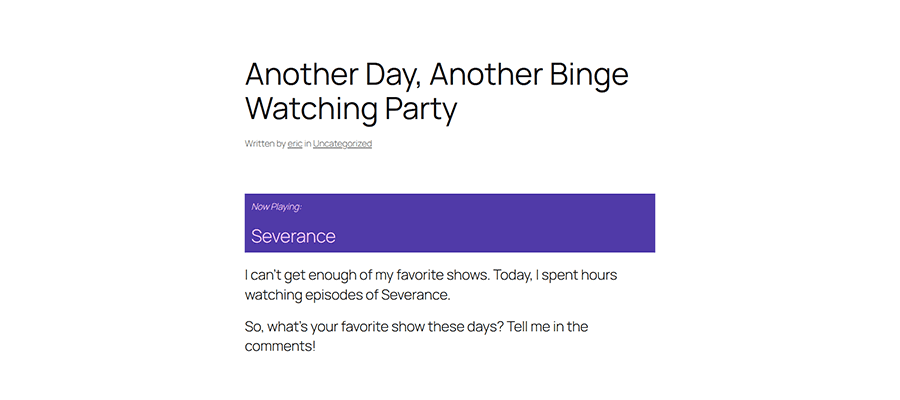
Our example is an homage to WordPress’ blogging roots. We’ll create a custom field called “Now Playing,” which we’ll fill out on each blog post. The field will contain a favorite song, movie, or TV show of the moment.
We’ll register the custom field in our theme, add it to the post template, and bind the field to a paragraph block.
We’re using the Twenty Twenty-Five default block theme. That means we can edit templates with the Site Editor.
Step 1: Register the Custom Field
First, we’ll register our custom field by adding code to our theme’s functions.php file. This lets WordPress know that our field is associated with posts.
Note the field’s slug, as we’ll need it later: now_playing
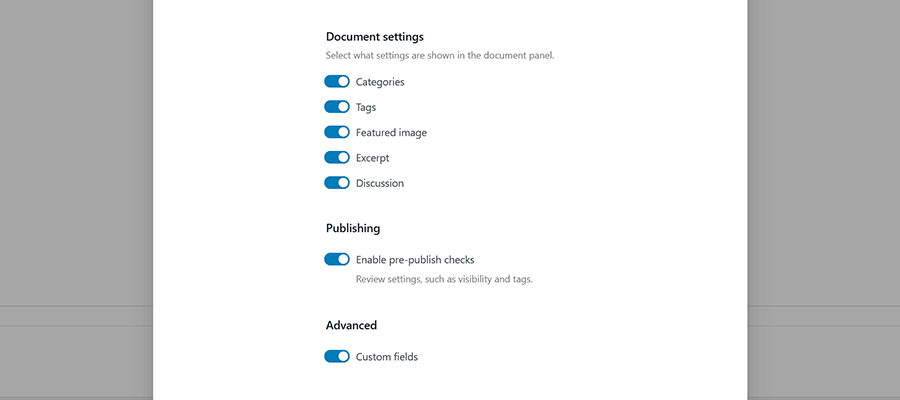
Step 2: Display Custom Fields in the Block Editor
By default, custom fields aren’t displayed in the Block Editor. So, we’ll have to enable the feature:
Open a post or page in the WordPress admin.
Inside the Block Editor, click on the Options menu (⋮).
Click on the Preferences link.
Go to the Advanced heading and turn on Custom fields.
WordPress will refresh the screen and display a custom fields UI at the bottom.
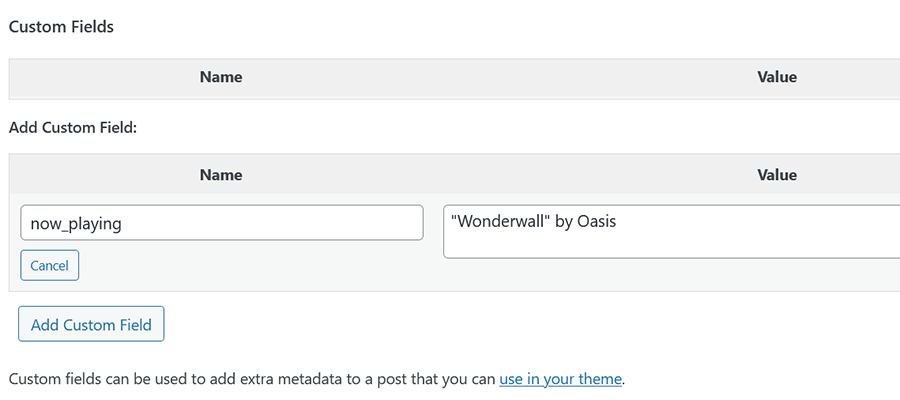
Step 3: Add a Custom Field to a Blog Post
Next, we’ll add our custom field to a blog post:
Navigate to Posts > Add New in the WordPress admin.
Give your post a title and add content.
Scroll down to the Custom Fields area of the editor.
Under the Name column, click the Add New button.
Enter the custom field slug in the Name field: now_playing
In the Value field (right column), enter the name of a song, movie, or TV show.
Publish your blog post.
Step 4: Bind the Custom Field to a Block
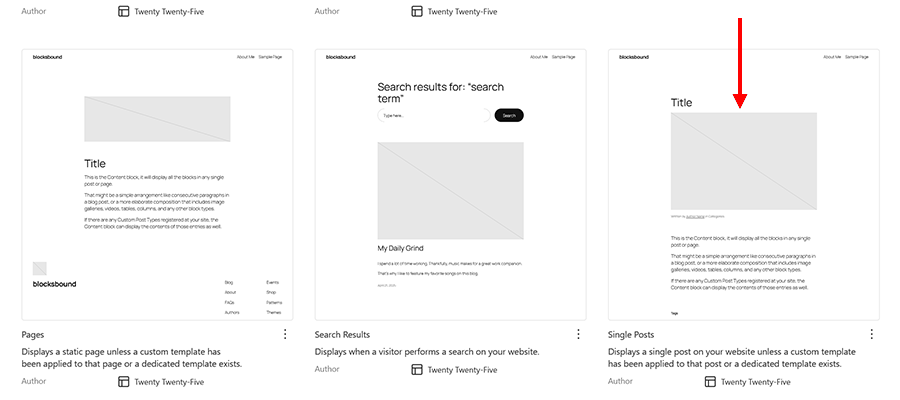
Now, it’s time to bind our custom field to a block. Since we’re using a block theme, we’ll navigate to Appearance > Editor.
We want to add custom field data to single blog posts. Inside the Site Editor, click on Templates, then click on Single Posts.
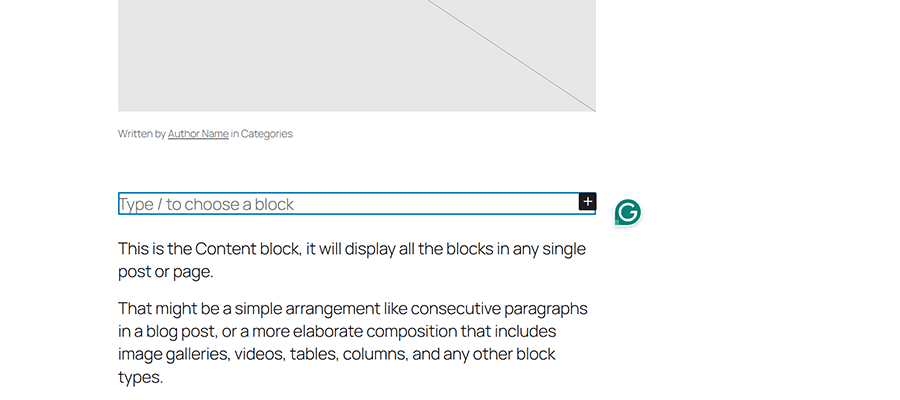
Next, we’ll choose a spot for our custom field in the Single Posts template. Just above the post content seems like a good choice.
Add a Paragraphblock to the chosen spot in the template. Don’t add any content to the block.
Select the Paragraph block (click into the block or select it from the List View panel).
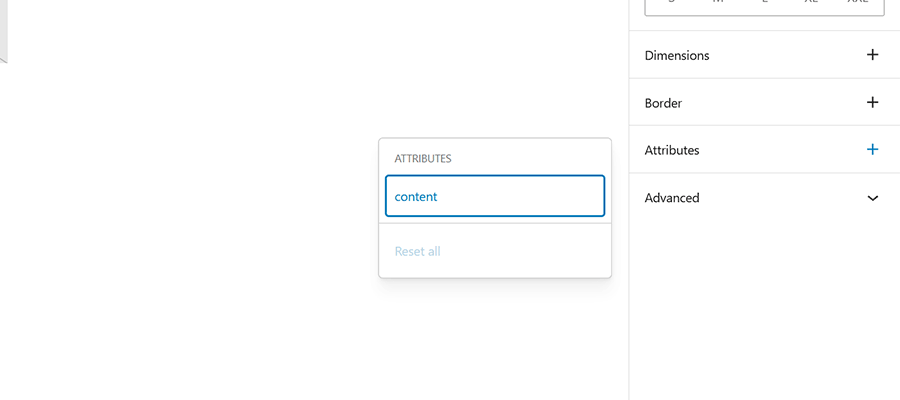
Click the “+” icon in the Attributes tab on the right column of the editor.
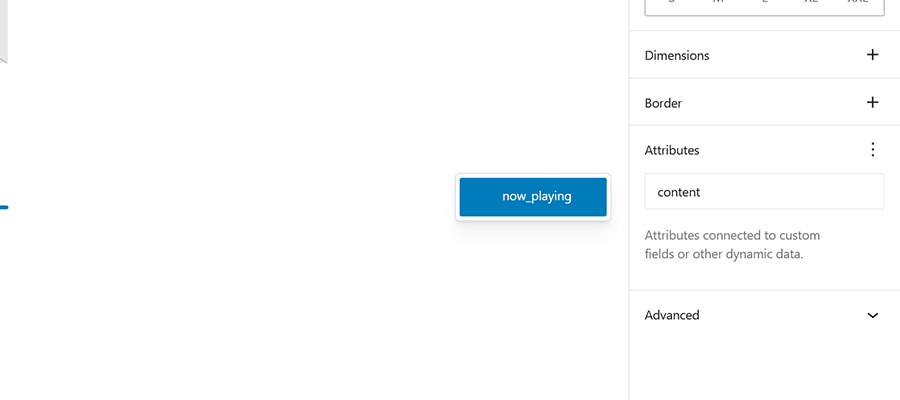
Select “content” from the Attributes list.
Click on “content” in the Attributes tab. A list of registered custom fields will appear. Select now_playing from the list. You might also add custom formatting to this area to make the field stand out. We chose the “Subtitle” style from the block settings.
Save the changes you made to the template.
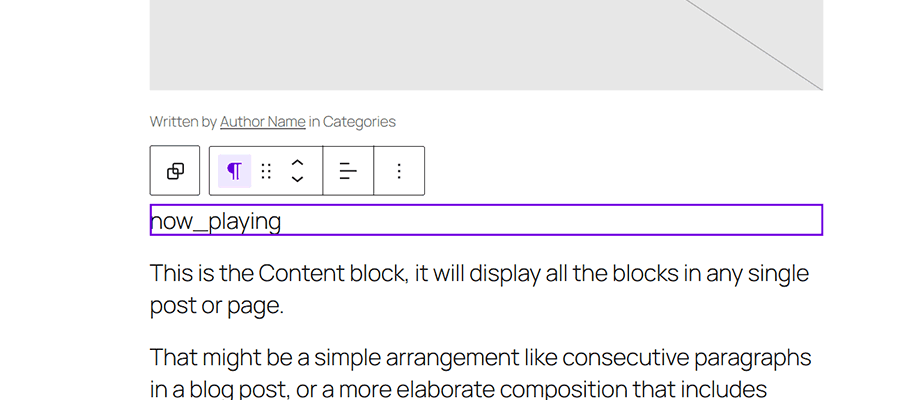
Notice that clicking on the Paragraph block reveals a purple outline. This denotes that the block is bound to a custom data source.
Step 5: View the Result on the Front End
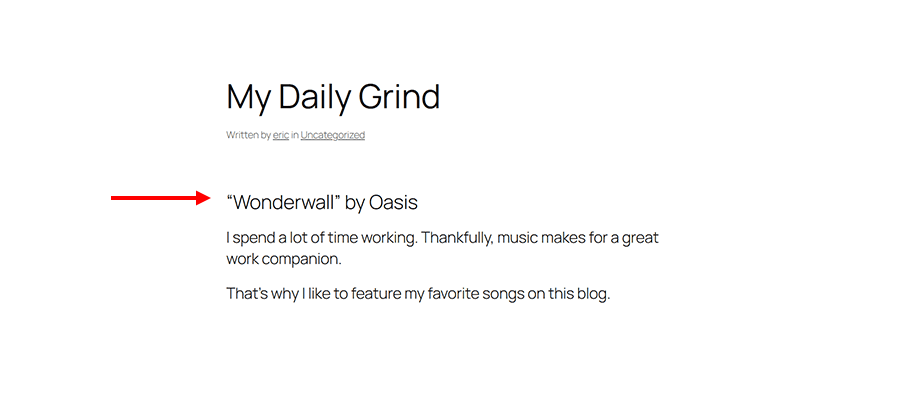
Let’s see how our custom field binding turned out. We’ll visit our blog post to see how it looks.
It’s working! Our song (“Wonderwall” by Oasis) is displayed above the post content.
The technical side of our example is done. However, we might want to tweak the styles or add another paragraph that says “Now Playing:” above the field. That would improve the feature’s look and accessibility.
An Easier Path for Using Custom Fields
Using WordPress custom fields is easier than ever. The Block Bindings API helps with simple use cases like the one above. It all works within the Block and Site editors.
That means less hassle for site builders. You don’t have to install a plugin or get tangled up in layers of PHP.
Plus, the feature is expected to evolve. For example, we may see more data types supported and a code-free way to register custom fields. It will be exciting to see what comes next.
Features like the Block Bindings API bring WordPress ever closer to a code-free experience. That puts a custom website within everyone’s reach.
Anthropic just launched ‘Integrations’ for Claude that enables the AI to talk directly to your favourite daily work tools. In addition, the company has launched a beefed-up ‘Advanced Research’ feature for digging deeper than ever before. Starting with Integrations, the feature builds on a technical standard…
If you’re building with AI, or trying to defend against the less savoury side of the technology, Meta just dropped new Llama security tools. The improved security tools for the Llama AI models arrive alongside fresh resources from Meta designed to help cybersecurity teams harness AI…
Baidu has unveiled ERNIE X1 Turbo and 4.5 Turbo, two fast models that boast impressive performance alongside dramatic cost reductions. Developed as enhancements to the existing ERNIE X1 and 4.5 models, both new Turbo versions highlight multimodal processing, robust reasoning skills, and aggressive pricing strategies designed…
You’ve just landed an interview for your dream job… tomorrow morning. Is last-minute prep worth it?
Career coach Sarah Chen says yes, focusing on high-impact areas can boost confidence. Quickly review the job description to tailor your answers, and identify key skills they seek. “Having those stories fresh in your mind can make a huge difference,” Chen advises.
Also, understand the company’s recent activities. “Mentioning something specific you learned… can demonstrate genuine interest,” she notes.
But, don’t cram. “Focus on understanding the big picture and identifying a few key talking points,” Chen says. Authenticity is crucial.
Last-minute preparation can sharpen your focus and help you present your best self, if you direct your limited time strategically.
Researchers have introduced RAGEN, an AI framework designed to counter LLM agent instability when handling complex situations. Training these AI agents presents significant hurdles, particularly when decisions span multiple steps and involve unpredictable feedback from the environment. While reinforcement learning (RL) has shown promise in static…
Keeping your website secure is a 24/7 job. The right tools help keep watch – even when you can’t. They could be the difference between a hacked site and business as usual.
WordPress security plugins are one part of that equation. Along with quality hosting and users practicing secure habits, a plugin can thwart common attacks. They act as the last line of defense against hackers.
Adding an extra layer of protection is important, as WordPress is a preferred target due to its popularity. Legions of bots are scanning sites, looking for flaws to exploit. A vulnerability in WordPress core, a theme, or a plugin puts you at risk. Custom code that isn’t sanitized is also a major concern.
Thankfully, there is a variety of security plugins available. They cover different niches and use cases. We’ll introduce you to the eight best free options that help lock down your website.
This plugin includes a firewall to prevent malware exploits and brute-force login attempts. However, its comprehensive malware scanner is the real star of the show. The scanner will look inside and outside your WordPress installation to find suspicious code.
Donate to the plugin and receive premium features like a WordPress core file integrity check. It’s worth installing if you suspect your site has been compromised.
Wordfence aims to be a complete security solution for WordPress. The plugin scans for malicious files, detects suspicious user activity, and blocks brute-force login attempts.
It also improves login security with two-factor authentication (2FA) and reCAPTCHA integration. The premium version offers a security audit log, a real-time IP blocklist, and a more robust firewall.
Jetpack has long been a do-it-all plugin suite. Jetpack Protect is a separate plugin for those who only want its security features. It scans your site daily for WordPress, plugin, and theme vulnerabilities.
You’ll also receive brute-force attack protection from botnets and other malicious actors. Upgrade to premium and receive email alerts, one-click malware fixes, and priority support.
The plugin formerly known as “iThemes Security” has plenty to offer in its free version. It protects against brute-force attacks at the local and network levels. Multiple types of 2FA can be added to user accounts, while strong password requirements keep users safer.
The plugin will detect file changes and scan your site for known vulnerabilities. The pro version adds trusted device recognition (to prevent session hijacking), passwordless login, and automated vulnerability patching.
Really Simple Security helps to fill common gaps in WordPress security. First, it ensures your site takes advantage of SSL via 301 redirects from non-HTTPS URLs. It also prevents code execution in your site’s uploads folder, disables the often-hacked XML-RPC feature, and enables 2FA.
You’ll also be notified of any known vulnerabilities. The pro version adds content security policy (CSP) generation, a firewall, and more security customizations.
A single-purpose plugin, Two-Factor adds 2FA to your WordPress website. It supports various methods, including email, Time Based One-Time Passwords (TOTP), and FIDO Universal 2nd Factor (U2F).
TOTP support means you can use it with apps like Google Authenticator. Note that you’ll need to assign 2FA to users individually. This makes it more suited for sites with a small number of users.
Brute force attacks are a problem for virtually every WordPress website. Even small sites can be swarmed by bots attempting to compromise your site. You can use this plugin to mitigate malicious login attempts.
It blocks offending IP addresses and covers all WordPress logins, including WooCommerce and XML-RPC. It’s also compatible with other security plugins. The pro version adds cloud-based IP blocking to the mix.
A safe website starts with securing user accounts. MelaPress Login Security helps by letting you create a custom login security policy. Options include setting a minimum password length, disabling recycled passwords, and forcing a password reset on first login.
You’ll also find brute-force login protection and the ability to limit logins to specific IP addresses. Upgrade to the pro version and gain trusted device recognition, disabling inactive users, and custom user session timeouts.
An Easy Way to Improve WordPress Security
Website security is complicated. It requires several measures to protect against attackers, many controlled by your web host. So, it’s up to us to take extra steps when possible. A WordPress security plugin is an easy way to do so.
The plugins on this list all have different strengths. Some are all-purpose, while others focus on a single aspect of security. Choose the ones that are right for your situation. But beware of combining multiple security plugins – they don’t always play nicely together.
Also, note that a plugin is only part of an overall security strategy. They can help, but won’t make up for an insecure hosting environment.
Now that you know some of the best free security plugins available, take a moment and determine how they fit into your strategy. Stay safe out there!
WordPress Security Plugin FAQs
What Are WordPress Security Plugins?
They are plugins designed to protect your WordPress site from security threats like hacking, malware, and unauthorized access. They add extra layers of security to your site.
Who Should Use WordPress Security Plugins?
Anyone with a WordPress site, from bloggers and small business owners to large organizations, should use security plugins. They’re essential for protecting your website and user data.
Why Are Security Plugins Important for WordPress Sites?
They safeguard your site against various cyber threats. They help prevent data breaches, protect user information, and make your website is safe and trustworthy.
How Do Security Plugins Improve a WordPress Site’s Safety?
They offer features like firewalls, regular security scans, protection against brute force attacks, and alerts for any suspicious activity. Some also help with secure backups.
Can Security Plugins Affect the Performance of My WordPress Site?
While some plugins might slightly affect site speed, most well-designed security plugins are optimized to minimize any impact on your website’s performance.
Should I Use Multiple Security Plugins on My Site?
It’s usually not necessary to use multiple security plugins. One comprehensive, well-rated plugin is often enough to cover most security needs.